[1]課題
 1.  	偶数奇数判定プログラム(GUIaa)をタイプし、その動作を考察せよ。
 2.  	例外処理について、考察せよ。
 3.  	上述のサンプルプログラムに出てきたGUI部品を、全て使ったプログラムを作成せよ。
 4.  	摂氏から華氏、華氏から摂氏への温度換算ができるプログラムを作成せよ。
 5.  	「電卓」プログラム。中身は自分の思うように。
[2]プログラム・考察
1. 偶数奇数判定プログラム(GUIaa)をタイプし、その動作を考察せよ。
GUIaaプログラム
1
2 import java.awt.*;            // GUIを作成するために
3 import java.awt.event.*;      // Abstract Window Toolkit(AWT)をインポートする
4
5 public class GUIaa extends Frame { // Frameを継承
6
7     Button    b0 = new Button("Even/Odd?");// Buttonクラスのオブジェクトを作成
8                                            // ボタンの中に表示させる文字列を決める
9     Label     x0 = new Label("Type a number and press...");
10                                           // Labelクラスのオブジェクトを作成する
11
12    TextField t0 = new TextField();        // TextFieldクラスのオブジェクトを作成
13
14
15    public GUIaa() {
16        setLayout(null);                   // GUIの配置を自分で決定することを示す
17        add(t0); t0.setBounds(10, 40, 90, 30);   // テキストフィールドの位置と大きさを指定
18        add(b0); b0.setBounds(110, 40, 100, 30); // ボタンの位置と大きさを指定
19        add(x0); x0.setBounds(10, 80, 180, 30);  // ラベルの位置と大きさを指定
20
21        b0.addActionListener(new ActionListener() { // ボタンが押されたとき生成されるイベント
22            public void actionPerformed(ActionEvent evt) {
23                int i = (new Integer(t0.getText())).intValue(); // 無名クラス
24                t0.setText("");                  // t0から数字を受け取った後、t0に何を表示させるか
25                if(i % 2 == 0) {                 // もしiを2で割ったあまりが0なら
26                    x0.setText(i + " is Even");  // ラベルに [~is Even] と表示させる
27                } else {                         // それ以外なら
28                    x0.setText(i + " is Odd");   // ラベルに[~is Odd ] と表示させる
29                }
30            }
31        });
32    }
33   public static void main(String[] args) {   // mainメソッドを定義
34        Frame win = new GUIaa();              // クラスFrameを継承したGUIaaを実体化する。
35
36        win.setSize(230, 150); win.setVisible(true); // ウィンドウのサイズを決める
37        win.addWindowListener(new WindowAdapter() {  // ウィンドウを閉じたときに生成されるイベント
38            public void windowClosing(WindowEvent evt) {
39                System.exit(0);                      // システムを終了させる
40            }
41        });
42    }
43 }
44
|
2. 例外処理について、考察せよ。
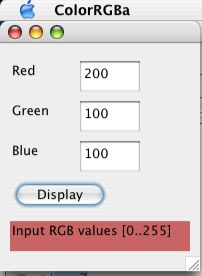
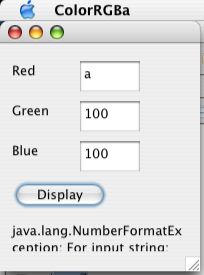
ColorRGBaプログラム
1  import java.awt.*;                                     // インポート部
2  import java.awt.event.*;
3
4  public class ColorRGBa extends Frame {
5      Button      b0 = new Button("Display");            // 必要なGUI部品をオブジェクト化
6      Label[]     la = new Label[]{new Label ("Red"),    // ラベルは3つの要素を持つ配列
7                                 new Label ("Green"),
8                                 new Label ("Blue")  };
9      TextField[] ta = new TextField[]{new TextField(),  //テキストフィールドも配列で実体化
10                                    new TextField(),
11                                    new TextField()};
12      Label       x0 = new Label("Input RGB values [0..255]"); // このアプリケーションの使い方を表示
13
14    public ColorRGBa() {
15        setLayout(null);                       // レイアウトはユーザ自身が決める
16        for(int i = 0; i < 3; i++) {           // ラベルとテキストフィールドの位置と大きさをきめる。
17            add(la[i]); la[i].setBounds(10, 40 + i*40, 60, 30);
18            add(ta[i]); ta[i].setBounds(80, 40 + i*40, 60, 30);
19        }
20        add(b0); b0.setBounds(10, 160, 100, 30);// ボタンの位置と大きさを決める
21        add(x0); x0.setBounds(10, 200, 180, 30);// 説明文のラベルの位置をきめる
22        b0.addActionListener(new ActionListener() {
23            public void actionPerformed(ActionEvent evt) { // ボタンが押された時のイベントの処理
24                try {                           // この中括弧内は例外が起こりうるコード
25                    x0.setBackground(new Color( // テキストフィールドの背景色を以下のRGBに変える
26                        (new Integer(ta[0].getText())).intValue(),  // R
27                        (new Integer(ta[1].getText())).intValue(),  // G
28                        (new Integer(ta[2].getText())).intValue()));// B
29                } catch(Exception ex) { x0.setText(ex.toString()); }
30                                                // 例外を受け取った場合、テキストフィールドに上記の文字列を表示させる
31            }
32        });
33    }
34    public static void main(String[] args) {        // mainメソッド
35        Frame win = new ColorRGBa();                // 上記のクラスをオブジェクト化
36        win.setSize(200, 250); win.setVisible(true);// ウィンドウの大きさ
37        win.addWindowListener(new WindowAdapter() { // ユーザが閉じるボタンを押した時の処理
38            public void windowClosing(WindowEvent evt) {
39                System.exit(0);                     // システムを終了させる
40              }
41          });
42      }
43  }
44
|
| la[0] | la[1] | la[2] | |
|---|---|---|---|
| la[] | "Red" |
"Green" |
"Blue" |
   for(int i = 0; i < 3; i++) {
            add(la[i]); la[i].setBounds(10, 40 + i*40, 60, 30);
            add(ta[i]); ta[i].setBounds(80, 40 + i*40, 60, 30);
            }
for文を使わないで上プログラムを書き直すと下のようになります。 add(la[1]); la[1].setBounds(10, 80, 60, 30);
add(ta[1]); ta[1].setBounds(80, 80, 60, 30);
add(la[2]); la[2].setBounds(10, 120, 60, 30);
add(ta[2]); ta[2].setBounds(80, 120, 60, 30);
add(la[3]); la[3].setBounds(10, 160, 60, 30);
add(ta[3]); ta[3].setBounds(80, 160, 60, 30);
同じ要素番号のラベルとテキストフィールドはx座標がちがうので横に並び、
要素数が2番目3番目となるとそれぞれy座標が40ずつ大きくなっているので縦に並びます。
22~30行目
ポタンが押された時のイベントの処理
・ここで例外処理が行われます。例外処理はこの後で考察します。
・アプリケーション利用者がテキストフィールドに入れた値に応じて
ラベルの背景色を変更します。
34~40行目
mainメソッドとプログラムの終了
・javaアプリケーションに必要なmainメソッドを定義します。
・ColorRGBaをオブジェクト化して実行できる形にします。
・ウィンドウの閉じるボタンを押したときに生成されるイベントを定義します。
考察
例外処理とはなにか
プログラム実行中に問題が発生した場合、それを知らせるために例外というオブジェクトが生成されます。
例外があらわれたときにどのように対応するのかを定めたのが例外処理です
例外が発生する主なケースは、整数を0で割った、ファイルが見つからなかった、数値の型が間違っていた
などがあります。そのほかにも、例外の引き金となる問題は多くあります。
例外処理の使い方
まず、例外が起こりうるプログラムをtryステートメントの中括弧で囲みます。
これを例外の発生を監視するといいます。
このtry部分に問題が起こった場合、例外オブジェクトが生成されます。
これを例外が投げられたといいます。
投げられた例外はtryプロックの直後にあるcatchブロックで処理されます。
これを例外を受けるといいます。
	 try {
	 例外が起こりうるプログラムコード;
	 ‥‥;
	 ‥‥;
	 }

	 catch (ExceptionType1 param1){
	 例外時の処理1
	 }

	 catch (ExceptionType2 param2){
	 例外時の処理2
	 }
	 ・
	 ・
	 finally {
	 ファイナリブロック
	 }
|
3.上述のサンプルプログラムに出てきたGUI部品を、
全て使ったプログラムを作成せよ。
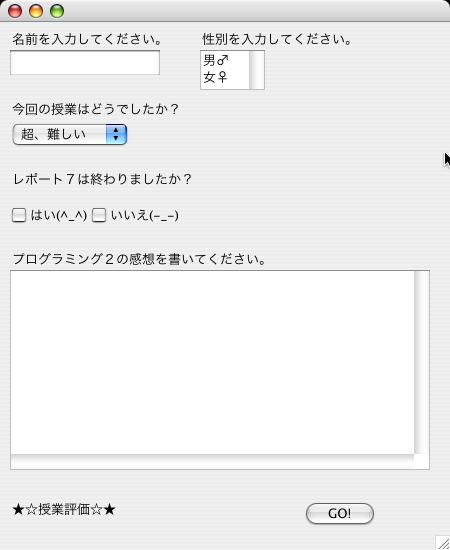
”上記のサンプルプログラムに出てきたGUI部品”というのは以下のGUI部品を指します。
・ラベル
・テキストフィールド
・ボタン
・テキストエリア
・チョイス
・リスト
・チェックボックス
これらをすべて使ったプログラムを作成しました。
このプログラムはアプリケーション利用者にアンケート形式の質問をするプログラムです。
3.上述のサンプルプログラムに出てきたGUI部品を、全て使ったプログラムを作成せよ。
import java.awt.*;
import java.awt.event.*;

public class R7_2 extends Frame {
    Button    b0 = new Button("GO!");

    Label     x0 = new Label("今回の授業はどうでしたか?");
    Label     x1 = new Label("名前を入力してください。");
    Label     x2 = new Label("性別を入力してください。");
    Label     x3 = new Label("レポート7は終わりましたか?");
    Label     x4 = new Label("プログラミング2の感想を書いてください。");
    Label     x5 = new Label("★☆授業評価☆★");

    TextField t0 = new TextField();

    Checkbox  c0 = new Checkbox("はい(^_^)");
    Checkbox  d0 = new Checkbox("いいえ(-_-)");

    List      l1 = new List();

    TextArea  t1 = new TextArea("");

    Choice    c1 = new Choice();

    public R7_2() {
        setLayout(null);
        add(b0); b0.setBounds(300, 500, 80, 30);

        add(x0); x0.setBounds(10, 100, 90, 30);
        add(x1); x1.setBounds(10, 30, 90, 30);
        add(x2); x2.setBounds(200, 30, 90, 30);
        add(x3); x3.setBounds(10, 170, 90, 30);
        add(x4); x4.setBounds(10, 250, 90, 30);
        add(x5); x5.setBounds(10, 500, 90, 40);


        add(t0); t0.setBounds(10, 50, 150, 25);


        add(c0); c0.setBounds(10, 200, 90, 30);
        add(d0); d0.setBounds(90, 200, 90, 30);

        add(l1); l1.setBounds(200, 50, 65, 40);

        l1.add("男♂"); l1.add("女♀");
        add(t1); t1.setBounds(10, 270, 420, 200);

        add(c1); c1.setBounds(10, 120, 120, 30);
        c1.add("超、難しい"); c1.add("ちと難しい"); c1.add("普通");
        c1.add("わりと簡単"); c1.add("超、簡単");

        b0.addActionListener(new ActionListener() {
                public void actionPerformed(ActionEvent evt) {
                    x5.setText("ありがとうございました。");
                }
            });


    }
    public static void main(String[] args) {
        Frame win = new R7_2();
        win.setSize(450, 550);
        win.setVisible(true);
 }
}
|
[実行結果]
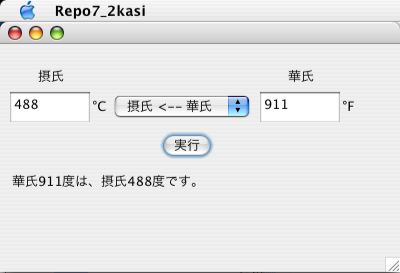
4. 摂氏から華氏、華氏から摂氏への温度換算ができるプログラムを作成せよ。
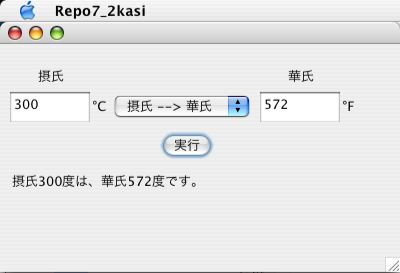
摂氏Cからに華氏Fに温度変換するときの式は
F = C×1.8+32 です。
ボタンを押してプログラムを実行したときにこの式をもちいて計算させるようにします。
Repo7_2kasiプログラム
1
2 import java.awt.*; //インポートする
3 import java.awt.event.*;
4
5 public class Repo7_2kasi extends Frame {
6 Label[] l0 = new Label[]{ new Label(" 摂氏"), // GUI部品のオブジェクト化
7 new Label(" 華氏")};
8 Label[] l1 = new Label[]{ new Label("°C"),
9 new Label("°F")};
10 TextField[] tf = new TextField[]{ new TextField(""),
11 new TextField("")};
12 Choice co = new Choice();
13 Button b0 = new Button("実行");
14 Label l2 = new Label("");
15
16 public Repo7_2kasi() {
17 setLayout(null);
18 add(l0[0]); l0[0].setBounds( 10, 45, 100, 30); // レイアウト
19 add(l0[1]); l0[1].setBounds(260, 45, 100, 30);
20 add(tf[0]); tf[0].setBounds( 10, 70, 80, 30);
21 add(tf[1]); tf[1].setBounds(260, 70, 80, 30);
22 add(co); co.setBounds(112, 70, 140, 30);
23 co.add(" 摂氏 ーー> 華氏"); co.add(" 摂氏 <ーー 華氏");
24 add(l1[0]); l1[0].setBounds( 90, 75, 20, 30);
25 add(l1[1]); l1[1].setBounds(340, 75, 20, 30);
26 add(b0); b0.setBounds(157, 110, 60, 30);
27 add(l2); l2.setBounds( 10, 150,400,100);
28
29 b0.addActionListener(new ActionListener() { //ボタンを押した時の処理
30 public void actionPerformed(ActionEvent evt) {
31 try { // 例外の発生を監視する
32 int n = co.getSelectedIndex();
33 if (n == 0){ // チョイスの矢印の向き
34 //(摂氏ー>華氏 or 摂氏<ー華氏 )で場合分け
35 int i = (new Integer(tf[0].getText())).intValue();
36 i = (int)Math.rint(1.8*i+32); // 摂氏から華氏にするときの式
37 tf[1].setText(""+ i);
38 l2.setText("摂氏"+tf[0].getText()+"度は、華氏"+i+"度です。");
39 }
40 else { // 華氏から摂氏にする場合
41 int j = (new Integer(tf[1].getText())).intValue();
42 j = (int)Math.rint ((j-32)/1.8);
43 tf[0].setText(""+ j);
44 l2.setText("華氏"+tf[1].getText()+"度は、摂氏"+j+"度です。");
45 }
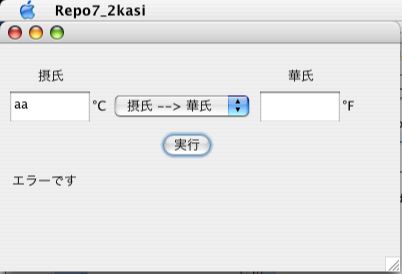
46 }catch(Exception err) { l2.setText("エラーです"); }
47 } // 例外を受けた時の処理
48 });
49 }
50
51 public static void main(String[] args) { // mainメソッド
52 Frame win = new Repo7_2kasi();
53 win.setSize(400, 250); win.setVisible(true);
54 win.addWindowListener(new WindowAdapter() {
55 public void windowClosing(WindowEvent evt) {
56 System.exit(0); //終了
57 }
58 });
59 }
60 }
61
|
32                int n = co.getSelectedIndex();
33          if (n == 0){                   // チョイスの矢印の向き
|
35                    int i = (new Integer(tf[0].getText())).intValue();
36                        i = (int)Math.rint(1.8*i+32);   // 摂氏から華氏にするときの式
37                        tf[1].setText(""+ i);
|
40                else {                              // 華氏から摂氏にする場合
41                    int j = (new Integer(tf[1].getText())).intValue();
42                        j = (int)Math.rint ((j-32)/1.8);
43                        tf[0].setText(""+ j);
|
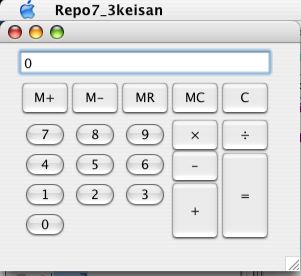
5. 「電卓」プログラム。中身は自分の思うように。
自ら「電卓」プログラムを作るのは技術的にも時間的にも難しいと思ったので
たまたま入った035750C 又吉威瑠さんのページから電卓プログラムを参考にさせてもらいました。
自分で工夫したところは、ボタンの配置を電卓風にしたことと、
電卓によくあるメモリー機能を付加したことです。
2  import java.awt.*;  //インポートする
3  import java.awt.event.*;

4  class Repo7_3keisan extends Frame{
     int i=0,j=0,k=0,l=0,m=-1,M=0;
     boolean er = false;
       Button[] b0 = new Button[]{  //ボタンを配列で生成&初期化
          new Button("0"),new Button("1"),new Button("2"),new Button("3"),new Button("4"),
          new Button("5"),new Button("6"),new Button("7"),new Button("8"),new Button("9"),
          new Button("+"),new Button("-"),new Button("×"),new Button("÷"),
          new Button("C"),new Button("=")
          };
       Button[] b1 = new Button[]{
          new Button("M+"),new Button("M-"),new Button("MR"),new Button("MC")
          };
17     TextField disp = new TextField("0");  //TextFieldを生成

19    public Repo7_3keisan(){
        setLayout(null);
          add(disp); disp.setBounds(20,30,250,20);  //配置
          for(i=0;i<16;i++) add(b0[i]);  //for文で配列のループ
             //ボタンの配置
          b0[ 0].setBounds(20, 190,50,30); b0[ 1].setBounds(20, 160,50,30);
          b0[ 2].setBounds(70, 160,50,30); b0[ 3].setBounds(120,160,50,30);
          b0[ 4].setBounds(20, 130,50,30); b0[ 5].setBounds(70, 130,50,30);
          b0[ 6].setBounds(120,130,50,30); b0[ 7].setBounds(20,100,50,30);
          b0[ 8].setBounds(70, 100,50,30); b0[ 9].setBounds(120,100,50,30);
          b0[10]/*+*/.setBounds(170,160,50,60); b0[11]/*-*/.setBounds(170,128,50,35);
          b0[12]/*×*/ .setBounds(170, 97,50,35); b0[13]/*÷*/.setBounds(220, 97,50,35);
          b0[14]/*C*/ .setBounds(220,60, 50,35); b0[15]/*=*/.setBounds(220,130,50,90);

          for(i=0;i<4;i++) add(b1[i]);
          b1[0].setBounds(20,60,50,35);b1[1].setBounds(70,60,50,35);
35        b1[2].setBounds(120,60,50,35);b1[3].setBounds(170,60,50,35);

          //以下ボタンを押した時のイベント
38        b0[0].addActionListener(new ActionListener() {
                  public void actionPerformed(ActionEvent evt) {
                      number(0);        //numberに0を入れて呼び出す、実行1
                      }
              });

          b0[1].addActionListener(new ActionListener() {
                  public void actionPerformed(ActionEvent evt) {
                      number(1);       //1を入れて呼び出し、実行
                  }
              });

          b0[2].addActionListener(new ActionListener() {
                  public void actionPerformed(ActionEvent evt) {
                      number(2);       //2を入れて呼び出し、実行
                  }
              });

          b0[3].addActionListener(new ActionListener() {
                  public void actionPerformed(ActionEvent evt) {
                      number(3);       //3を入れて呼び出し、実行
                  }
              });

          b0[4].addActionListener(new ActionListener() {
                  public void actionPerformed(ActionEvent evt) {
                      number(4);        //4を入れて呼び出し、実行
                  }
              });

          b0[5].addActionListener(new ActionListener() {
                  public void actionPerformed(ActionEvent evt) {
                      number(5);       //5を入れて呼び出し、実行
                  }
              });

          b0[6].addActionListener(new ActionListener() {
                  public void actionPerformed(ActionEvent evt) {
                      number(6);       //6を入れて呼び出し、実行
                  }
              });

          b0[7].addActionListener(new ActionListener() {
                  public void actionPerformed(ActionEvent evt) {
                  	number(7);        //7を入れて呼び出し、実行
                  }
              });

          b0[8].addActionListener(new ActionListener() {
                  public void actionPerformed(ActionEvent evt) {
                      number(8);         //8を入れて呼び出し、実行
                  }
              });

          b0[9].addActionListener(new ActionListener() {
                  public void actionPerformed(ActionEvent evt) {
                      number(9);          //9を入れて呼び出し、実行
                  }
              });

          b0[10].addActionListener(new ActionListener() {
                  public void actionPerformed(ActionEvent evt) {
                     operator1();         //operator1()を実行
                  }
              });

          b0[11].addActionListener(new ActionListener() {
                  public void actionPerformed(ActionEvent evt) {
                      operator2();         //operator2()を実行
                  }
              });

          b0[12].addActionListener(new ActionListener() {
                  public void actionPerformed(ActionEvent evt) {
                      operator3();         //operator3()を実行
                  }
              });


          b0[13].addActionListener(new ActionListener() {
                  public void actionPerformed(ActionEvent evt) {
                      operator4();         //operator4()を実行
                  }
              });
122
          b0[14].addActionListener(new ActionListener() {
                  public void actionPerformed(ActionEvent evt) {
                      k=0;          //kに0を入れる
                      l=0;          //lに0を入れる
                      m=-1;         //mに-1を入れる
                      er = false;   //erにfalseを入れる
                      disp.setText("0");
                  }
131           });

          b0[15].addActionListener(new ActionListener() {
                  public void actionPerformed(ActionEvent evt) {
                      equal();       //equalを実行
                  }
              });
138       b1[0].addActionListener(new ActionListener() { // M+を押したとき
          	     public void actionPerformed(ActionEvent evt) {
          	       try {
          	     	 M = M + (new Integer(disp.getText())).intValue();
          	       }catch(Exception ex) {disp.setText("Error");}
          	       l = 0;
				 }
              });
          b1[1].addActionListener(new ActionListener() { // M-を押したとき
     	         public void actionPerformed(ActionEvent evt) {
     	     	   try {
     	         	M = M - (new Integer(disp.getText())).intValue();
     	     	   }catch(Exception ex) {disp.setText("Error");}
     	     	   l = 0;
     	         }
              });
          b1[2].addActionListener(new ActionListener() { // MRを押したとき
     	         public void actionPerformed(ActionEvent evt) {
     	     	     disp.setText("" + M);               // Mを表示
     	         }
              });
          b1[3].addActionListener(new ActionListener() { // MCを押したとき
     	         public void actionPerformed(ActionEvent evt) {
     	     	     M = 0;                              // Mをクリア
     	         }
163           });

      }
       //以下ボタンを押した時のイベントの処理
167   public void number(int a){
          l = l * 10 + a;         //l*10+aをlに入れる
          if(er) disp.setText("Error:Push C");     //エラーの表示
          else disp.setText(""+l);      //でなければlを表示
171   }

173   public void operator1(){
          enzan();   //enzanを呼び出す
          l = 0;   //0をlに代入
          m = 0;   //0をmに代入
      }

      public void operator2(){
          enzan();
          l = 0;
          m = 1;   //1をmに代入
      }

      public void operator3(){
          enzan();
          l = 0;
          m = 2;  //2をmに代入
      }

      public void operator4(){
          enzan();
          l = 0;
          m = 3;  //3をmに代入
195   }

197   public void enzan(){
          switch (m) {   //switch文を開始
          case 0:        //mが0の場合
              k = k + l;     //k+lをkにいれる
              if(!er) disp.setText(""+k);  //エラーでなかったらkを表示
              break;
          case 1:             //mが1の場合
              k = k - l;       //k-lをkにいれる
              if(!er) disp.setText(""+k);
              break;
          case 2:             //2の場合
              k = k * l;      //k*lをkに入れる
              if(!er) disp.setText(""+k);
              break;
          case 3:              //3の場合
              if(l == 0){      //もしlが0の場合
                  er = true;   //trueをerにいれる
                  break;
              }
              k = k / l;     //k/lをkにいれる
              if(!er) disp.setText(""+k);
              break;
          case -1:    //-1の場合
              k= new Integer(disp.getText()).intValue();
              break;
          default:
              break;
224       }
      }

227   public void equal(){
          enzan();
          l = 0;
          m = -1;
          if(!er) disp.setText(""+k);
          else disp.setText("Error:Push C");  //エラーの表示
233   }
       //ウィンドウの生成&初期化
235   public static void main(String[] args){
          Frame win = new Repo7_3keisan();
          win.setSize(300, 250);  //ウィンドウのサイズ指定
          win.setVisible(true);
          win.addWindowListener(new WindowAdapter() {  //ウィンドウに関するイベント
                  public void windowClosing(WindowEvent evt) {
                      System.exit(0);  //終了
                  }
              });
244   }
  }
|
int i=0,j=0,k=0,l=0,m=-1,M=0; boolean er = false; |
 b0[0].addActionListener(new ActionListener() {
                  public void actionPerformed(ActionEvent evt) {
                      number(0);        //numberに0を入れて呼び出す、実行1
                      }
                  });
|
 b0[10].addActionListener(new ActionListener() {
                 public void actionPerformed(ActionEvent evt) {
                    operator1();         //operator1()を実行
	                }
                 });
|
          b0[14].addActionListener(new ActionListener() {
                  public void actionPerformed(ActionEvent evt) {
                      k=0;          //kに0を入れる
                      l=0;          //lに0を入れる
                      m=-1;         //mに-1を入れる
                      er = false;   //erにfalseを入れる
                      disp.setText("0");
                  }
|
    public void number(int a){
          l = l * 10 + a;
          if(er) disp.setText("Error:Push C");
          else disp.setText(""+l);
    }
|
197   public void enzan(){
          switch (m) {   //switch文を開始
          case 0:        //mが0の場合
              k = k + l;     //k+lをkにいれる
              if(!er) disp.setText(""+k);  //エラーでなかったらkを表示
              break;
          case 1:             //mが1の場合
              k = k - l;       //k-lをkにいれる
              if(!er) disp.setText(""+k);
              break;
          case 2:             //2の場合
              k = k * l;      //k*lをkに入れる
              if(!er) disp.setText(""+k);
              break;
          case 3:              //3の場合
              if(l == 0){      //もしlが0の場合
                  er = true;   //trueをerにいれる
                  break;
              }
              k = k / l;     //k/lをkにいれる
              if(!er) disp.setText(""+k);
              break;
          case -1:    //-1の場合
              k= new Integer(disp.getText()).intValue();
              break;
          default:
              break;
224       }
|
[3]反省・感想
今回のプログラムは長くて大変だった。
アプリケーションのGUIはプログラムの書き方が定型化しているので分かりやすかった。
[4]参考文献
ジョゼフ・オニール 著『 独習 Java 第3版 』