38. LLMにおけるトークナイザの振る舞いとトークン埋め込みの観察#
38.1. 背景#
自然言語をコンピュータで処理するためには例えば Bag-of-Words のような方法で数値化(数値ベクトル化)する必要がありました。しかしながらBoWでは未知語(新語)へ柔軟に対応することが困難です。これに対し現在の主流は サブワードトークン化 と呼ばれる方式で数値化します。
この資料では、軽量かつ高品質を謳うmicrosoft/Phi-3-mini-4k-instructを例に、サブワードトークン化や埋め込みベクトルを眺めていきます。
なお、どのようにトークン化されるのか、どのような埋め込みベクトルとして表現されるのかはモデル毎に異なります。
38.2. トークン化の例#
sentenceに保存した以下の例文がどのようにトークン化されるのか眺めてみましょう。
38.2.1. モデルとトークナイザのダウンロードと用意#
多くの場合、AutoTokenizerでトークナイザを用意し、AutoModelForCausalLMでモデルを用意するだけで済むことが多い。事前学習済みモデルを引数で指定することで、初期実行時には自動でダウンロードしてくれる。
AutoModelForCausalLM: 因果言語モデル向けのモデルラッパー。因果言語モデル=前から後ろに順番にトークンを予測するタイプの言語モデル。GPT系をはじめとする Transformer Decoder をベースにしているモデルが該当。
他の代表的な言語モデル
Masked LM: 入力中の一部のマスに対して予測するタイプの言語モデル。BERT。
Seq2Seq LM: 入力系列→出力系列への変換を行うタイプの言語モデル。T5, BART等。
from transformers import AutoModelForCausalLM, AutoTokenizer

# モデルをダウンロードし、利用できるように用意する
model_name = "microsoft/Phi-3-mini-4k-instruct"
model = AutoModelForCausalLM.from_pretrained(model_name,
                                             device_map="auto",  # モデルをCPU/GPU環境に合わせて読み込む
                                             torch_dtype="auto") # データ型を自動選択
tokenizer = AutoTokenizer.from_pretrained(model_name)
/usr/local/lib/python3.11/dist-packages/huggingface_hub/utils/_auth.py:94: UserWarning:
The secret `HF_TOKEN` does not exist in your Colab secrets.
To authenticate with the Hugging Face Hub, create a token in your settings tab (https://huggingface.co/settings/tokens), set it as secret in your Google Colab and restart your session.
You will be able to reuse this secret in all of your notebooks.
Please note that authentication is recommended but still optional to access public models or datasets.
  warnings.warn(
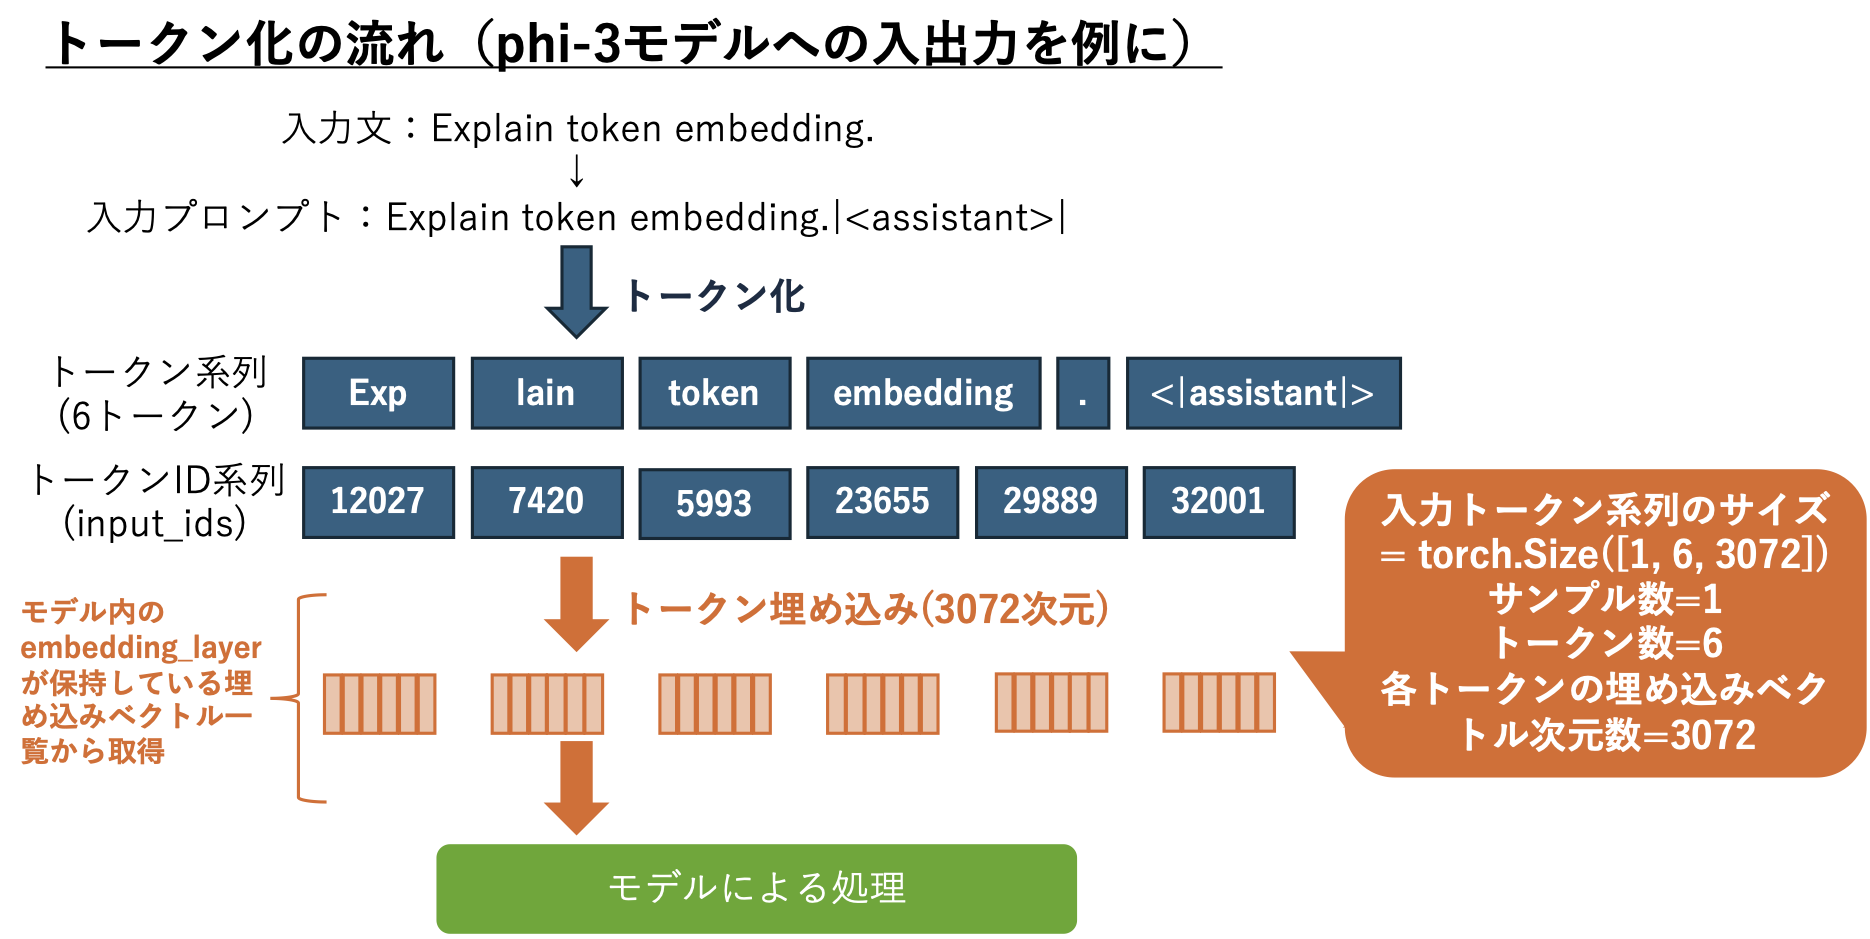
38.2.2. 入力文→プロンプトへの変換#
モデル毎にフォーマットが異なるため一意な方法で準備できるわけではない点に注意すること。
ここではphi-3で指定されているChat Formatに基づき、簡略化したプロンプトに変換してモデルに入力することにした。<|assistant|>を最後に追加しているのは、phi-3がこの専用トークンの後ろにテキスト生成するように学習させている(where the model generates the text after <|assistant|>)ためだ。
# 入力文の用意
sentence = "Explain token embedding." # 入力文
prompt = f"{sentence}<|assistant|>"   # 専用トークンを追加
print(f"{prompt=}")
prompt='Explain token embedding.<|assistant|>'
38.2.3. 入力プロンプトをトークン化する#
トークナイザは自然言語をトークン化し、更にそれをid系列(ids)に変換するところまでを自動実行してくれる。
今回の例では Expalin が Expとlainに分割されている。このようにトークンと単語とは必ずしも一致しないことに注意しよう。
# 入力プロンプトを環境に応じて指定先に送るための設定
import torch
device = torch.device("cuda" if torch.cuda.is_available() else "cpu")

# トークン化(ここでは説明の都合上 input_ids だけを対象にしている)
input_ids = tokenizer(prompt, return_tensors="pt").input_ids.to(device)
print(f"{input_ids=}")
input_ids=tensor([[12027, 7420, 5993, 23655, 29889, 32001]], device='cuda:0')
# デコードしてidに対応するトークンを確認する
for id in input_ids[0]:
  print(id, tokenizer.decode(id))
tensor(12027, device='cuda:0') Exp
tensor(7420, device='cuda:0') lain
tensor(5993, device='cuda:0') token
tensor(23655, device='cuda:0') embedding
tensor(29889, device='cuda:0') .
tensor(32001, device='cuda:0') <|assistant|>
38.2.4. テキスト生成してみる#
model.generate()へトークンID系列を与えると、テキスト生成結果を取得できる。取得結果もトークンID系列なため、テキストで読むためにはデコードし直す必要がある。
出力結果を確認すると、<|assistant|>の後ろにスペースが入り、その後に生成文が追加されている様子を確認できる。
generation_output = model.generate(
    input_ids=input_ids, # トークンID系列を入力として与える
    max_new_tokens=10)   # 最大出力トークン数を指定(長いほど計算機リソースを必要とする)

print(generation_output)
The attention mask is not set and cannot be inferred from input because pad token is same as eos token. As a consequence, you may observe unexpected behavior. Please pass your input's `attention_mask` to obtain reliable results.
tensor([[12027,  7420,  5993, 23655, 29889, 32001, 25159, 23655,   338,   263,
         15281,  6964,   297,  5613,  4086,  9068]], device='cuda:0')
# デコード
print(tokenizer.decode(generation_output[0]))
Explain token embedding.<|assistant|> Token embedding is a fundamental concept in natural language processing
38.3. トークン埋め込みの確認#
モデルにはトークンID系列が入力されるが、そのIDは埋め込みベクトルに1対1対応しており、実際には埋め込みベクトルに置き換えて処理される。
input_ids: 入力トークンID系列。最大トークン長より短い場合にはpaddingする。最大トークン長より長い場合は打ち切り処理をする。ここでは省略。attention_mask: モデルが参照する(入力文として受け入れる)トークン位置の指定。ここでは入力トークン数と同じ数の6個分だけ1を並べている。paddingのように不要なトークン部分には0を与え、参照しないようにする。
# 入力プロンプトを attention_mask 付きで処理する
tokens = tokenizer(prompt, return_tensors="pt").to(device)
tokens
{'input_ids': tensor([[12027, 7420, 5993, 23655, 29889, 32001]], device='cuda:0'), 'attention_mask': tensor([[1, 1, 1, 1, 1, 1]], device='cuda:0')}
# 埋め込み層を取得
embedding_layer = model.get_input_embeddings()

# 埋め込みベクトルを取得
input_embeddings = embedding_layer(tokens["input_ids"])
print(input_embeddings.shape)
torch.Size([1, 6, 3072])
torch.Size([1, 6, 3072]) とは、3072次元の埋め込みベクトルが6トークン分出力されていることを意味している。最初の1はバッチ処理時のサンプル数であり、複数プロンプトをまとめて処理した際にこの数字が増えることになる。
38.3.1. 改めて入力トークン系列を確認#
for token in tokens["input_ids"][0]:
  print(token, tokenizer.decode(token))
tensor(12027, device='cuda:0') Exp
tensor(7420, device='cuda:0') lain
tensor(5993, device='cuda:0') token
tensor(23655, device='cuda:0') embedding
tensor(29889, device='cuda:0') .
tensor(32001, device='cuda:0') <|assistant|>
38.3.2. トークン埋め込みの確認#
input_embeddings
tensor([[[ 0.0247, -0.0898,  0.0262,  ..., -0.0417,  0.0178, -0.0264],
         [ 0.0339,  0.0527,  0.0167,  ..., -0.0029,  0.0238,  0.0104],
         [ 0.0215, -0.0383,  0.0256,  ..., -0.0259, -0.0148, -0.0630],
         [ 0.0015,  0.0123,  0.0732,  ...,  0.0220, -0.0386, -0.0337],
         [-0.0032,  0.0027,  0.0014,  ..., -0.0048, -0.0239, -0.0068],
         [ 0.0203,  0.0388, -0.0060,  ...,  0.0050, -0.0427,  0.0620]]],
       device='cuda:0', dtype=torch.bfloat16, grad_fn=<EmbeddingBackward0>)